Fibre Crafts za
October 2010
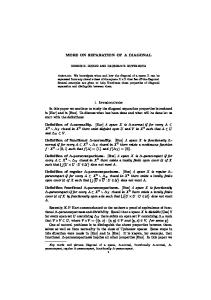
Diagonal Weaving by Luise Duke of Pelume Crafts Frame weaving, or the art of warping and weaving at the same time, is an interesting weaving concept. All sorts of yarns/materials can be incorporated into the weaving, for example gift wrap ribbon makes a very pretty bling waterproof outdoor cushion cover. The squares, woven in the diagonal, have excellent drape and are perfect for stitching together to make scarves, jackets, gilets, ponchos and placemats. Given some textured yarns and a little imagination one can create lovely items. The frames come in all sizes and shapes, from 5 cm square to 60 cm square, rectangles, triangles and circles. Anybody interested in purchasing Diagonal Weaving Frames or finding out more about the crafts Pelume offers, contact Louise from Pelume Crafts at +27-(0)12-711 4356. Two beautiful samples of articles made on the Diagonal weaving frame.
Jacket by Linda Tacke Cushion cover by Hantie Gregersen. ________________________________________________________________________ Instruction guide to Diagonal Weaving. (The 20 cm frame is pictured)
Step 1: Make a long slipknot and hook it around the corner nail in the bottom left hand side. Pull the loop up to the top right corner and hook around the corner nail. The tail and uncut end stays at the bottom left corner.
1
Fibre Crafts za
October 2010
Step 2: Take the uncut end around the first open nail, next to the corner nail, going up the left hand side, and follow the previous thread across, on the diagonal, to the first open nail on the top side. Hook around this nail from outside, around and back to the inside. Keep a bit of tension on the thread so that it does not jump off the nail.
Now weave with the hook - miss the first thread, weave under the next thread and over the next. Grab the thread you are holding that you hooked around the nail, and gently pull it through to the other side. Hook this on the next open nail, on the right side going down. You will see that the thread weaves through in a double weave.
Pull the lower thread down to the bottom and hook it around the empty nail in the right hand corner side. Now top and bottom have been woven simultaneously. One complete round has been performed. To set up for the next round, simply hook thread around the next open nail on the lower left side and bring it up diagonally to the right top corner. When you begin the weaving, go over the first thread.
2
Fibre Crafts za
October 2010
Step 3: Continue weaving and drawing thread through in these rounds moving from bottom left side, to right top, weave, hook on top right side, pull down to bottom right side, and hook on new nail on bottom left side.
Woven threads can be kept neat by easing to their place with a table fork: or an afro comb. When you want to change colour or replace a thread, finish a complete movement. On the left side, before hooking onto the new nail, cut off first thread, leaving a tail. Knot the new thread to this tail as close to the nails as possible and take the new thread up to the nail on the right. Never cut the thread before the movement is finished.
If the hook becomes too short to weave the full width, or the thread is a bit "hooky", start the weave in the middle of the work. Work under the threads, pull the wool through to that point leaving a nice long bit, move along to the next section and weave from there to where you ended last time, pull through and so on until the row is complete.
If you have made a mistake, lift the thread off one complete movement of nails (4 nails) and gently pull the thread out until that movement is undone. This can be done step by step until the mistake is resolved.
3
Fibre Crafts za
October 2010
Step 4: When all the nails are full except the 2 diagonal corners, measure the thread along the diagonal from the top empty nail to the bottom nail. Allow an extra amount for knotting off. Measure the distance from nail to nail and add half that amount again. Cut off here and thread into a blunt needle. Weave singly through this last row to the nail. Knot off around this last nail securely.
Gently move all the weaving up to the top of the nails to just before it jumps off and lift the loops up over the nails. The last side will just lift off easily. There is no further finishing necessary- just sew up the squares to create whatever you have planned.
4